The behaviour tree designed for this ongoing project encompasses both independent AI tasks as well as player input. For example, the behaviour tree in this example is the ‘Combat’ Tree and therefore must handle changes in player input such as an attack or move command but also must attack nearby enemy units independently of player control.

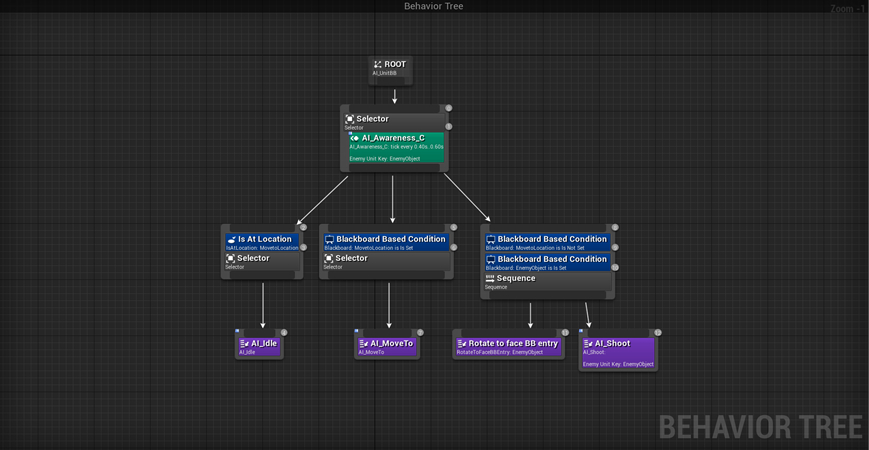
The above image shows the current iteration of the combat tree, this mainly encompasses an Idle, MoveTo and Attack tasks based on the results given through an AI_Awareness service, this service is responsible for checking a given area and returning any valid pawn with another TeamID to the controlled pawn. This is done using a multi-sphere trace as shown in the image below:
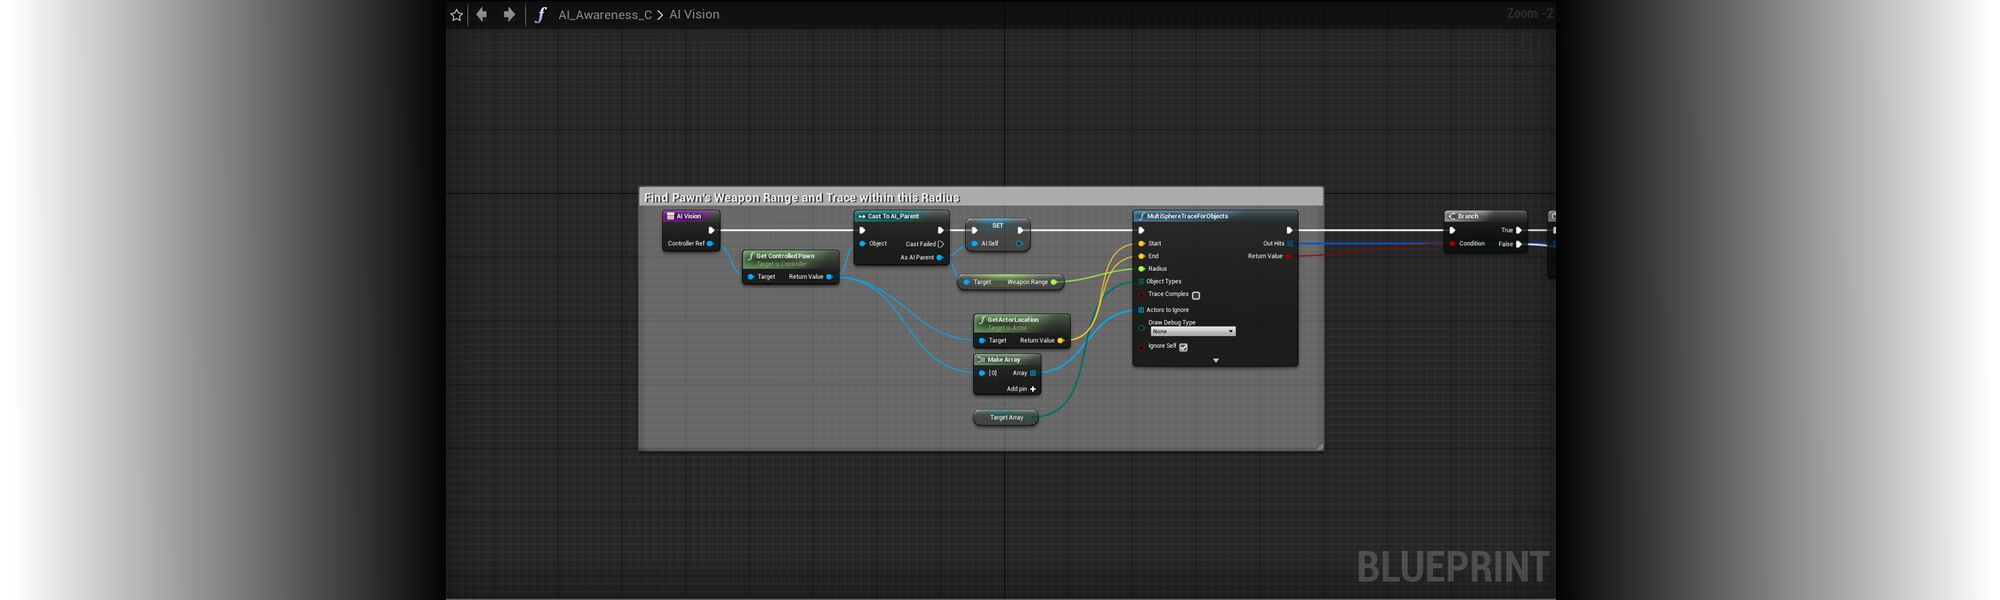
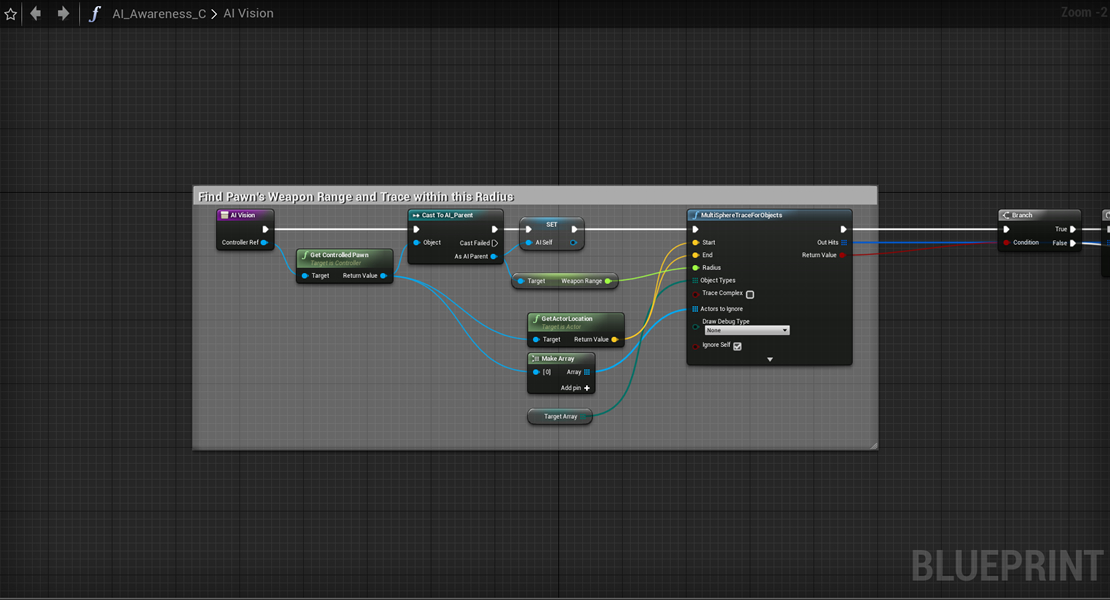
The ‘WeaponRange’ variable is pulled from the controlled pawn’s variables using the AI Parent class, this ensures that each individual pawn will search for targets based upon its own weapon range rather than using a uniform range for all pawns.
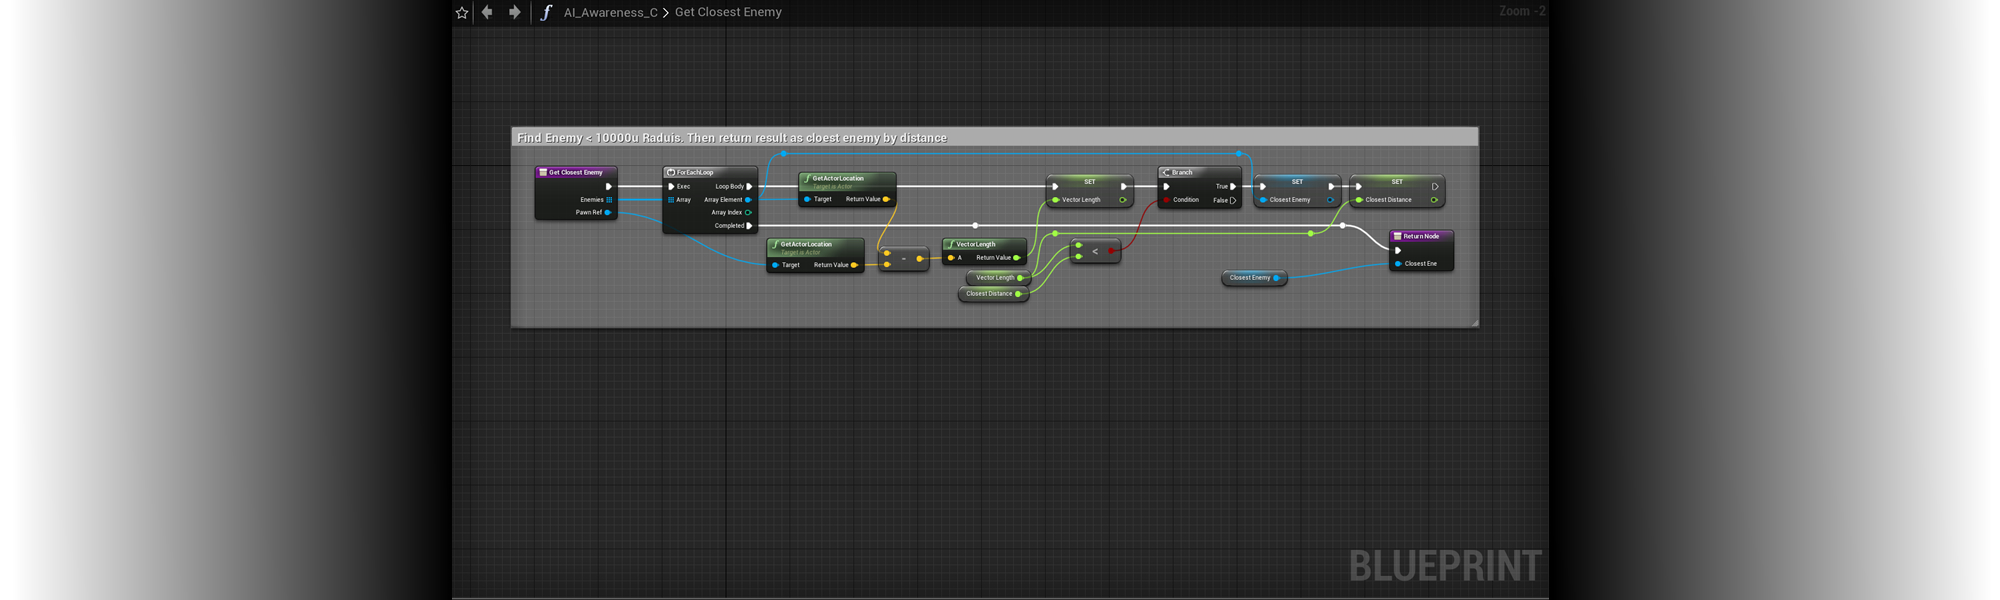
The second half of this process is then to find the TeamID of the targeted enemy pawn and, if not equal to the controlled pawn’s TeamID, add this pawn to an array of potential targets.
This array is then looped through to find the closest enemy pawn by distance to the controlled pawn by finding the vectorlength of each pawn’s location and comparing it to a base ‘closestdistance’ value of 10000. The closet pawn is then set as the single closest enemy to the controlled pawn.

The AI_Awareness service in of itself clears the ‘EnemyPawn’ blackboard key on each cycle, this is for two reasons, firstly to ensure that the controlled pawn does not continue attacking the previously set enemy pawn after it has since moved out of range; and secondly, to ensure that the controlled pawn is always switching targets to the closet enemy pawn. A new target is always set on each AI cycle unless there are no enemy units within range.
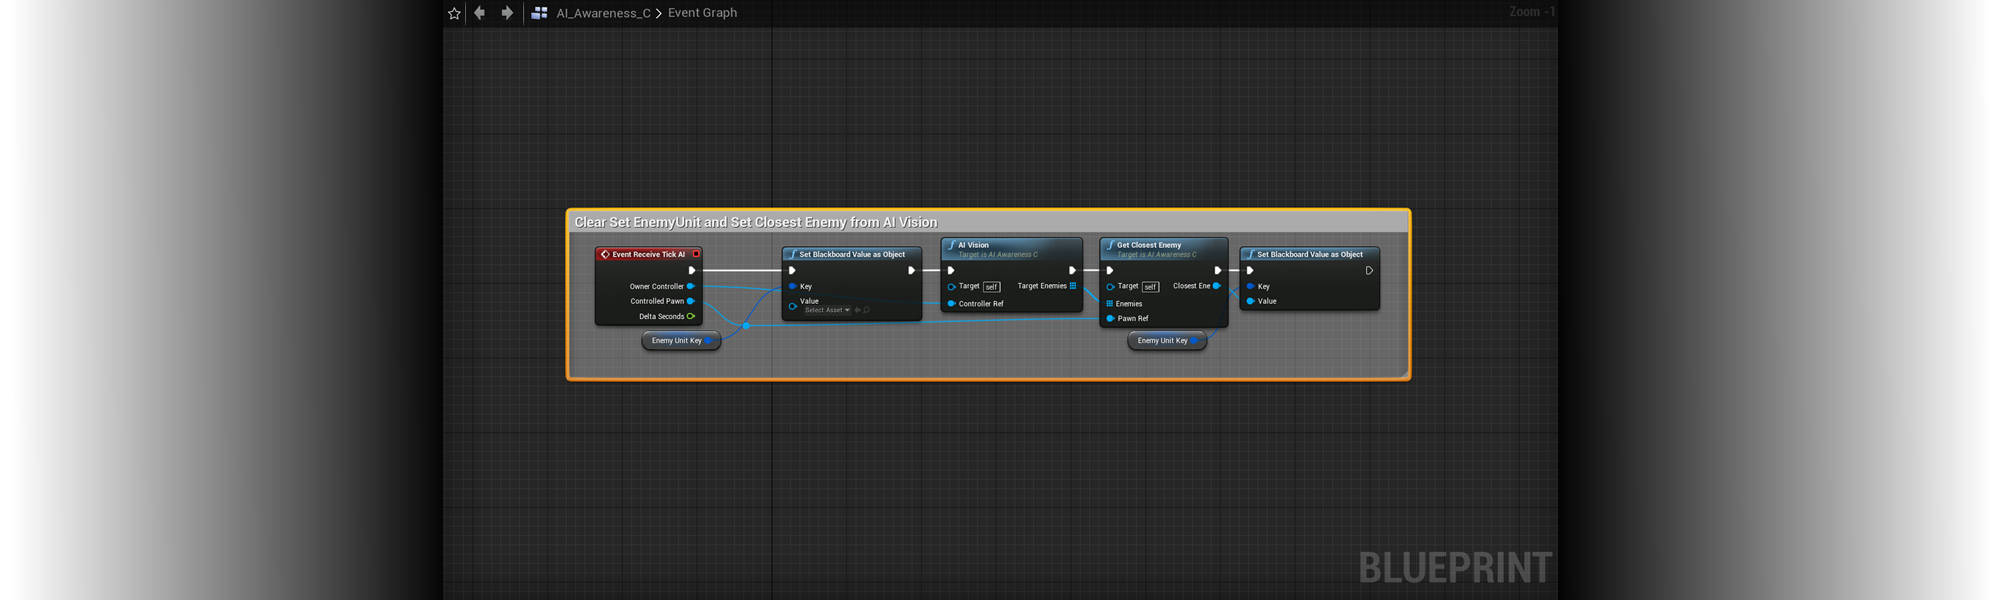
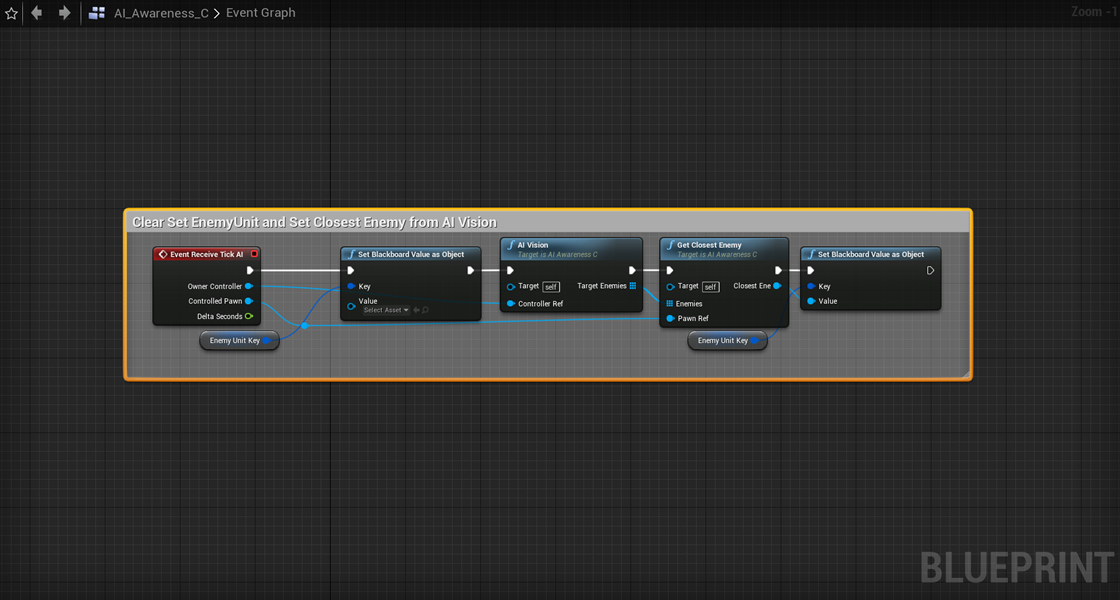
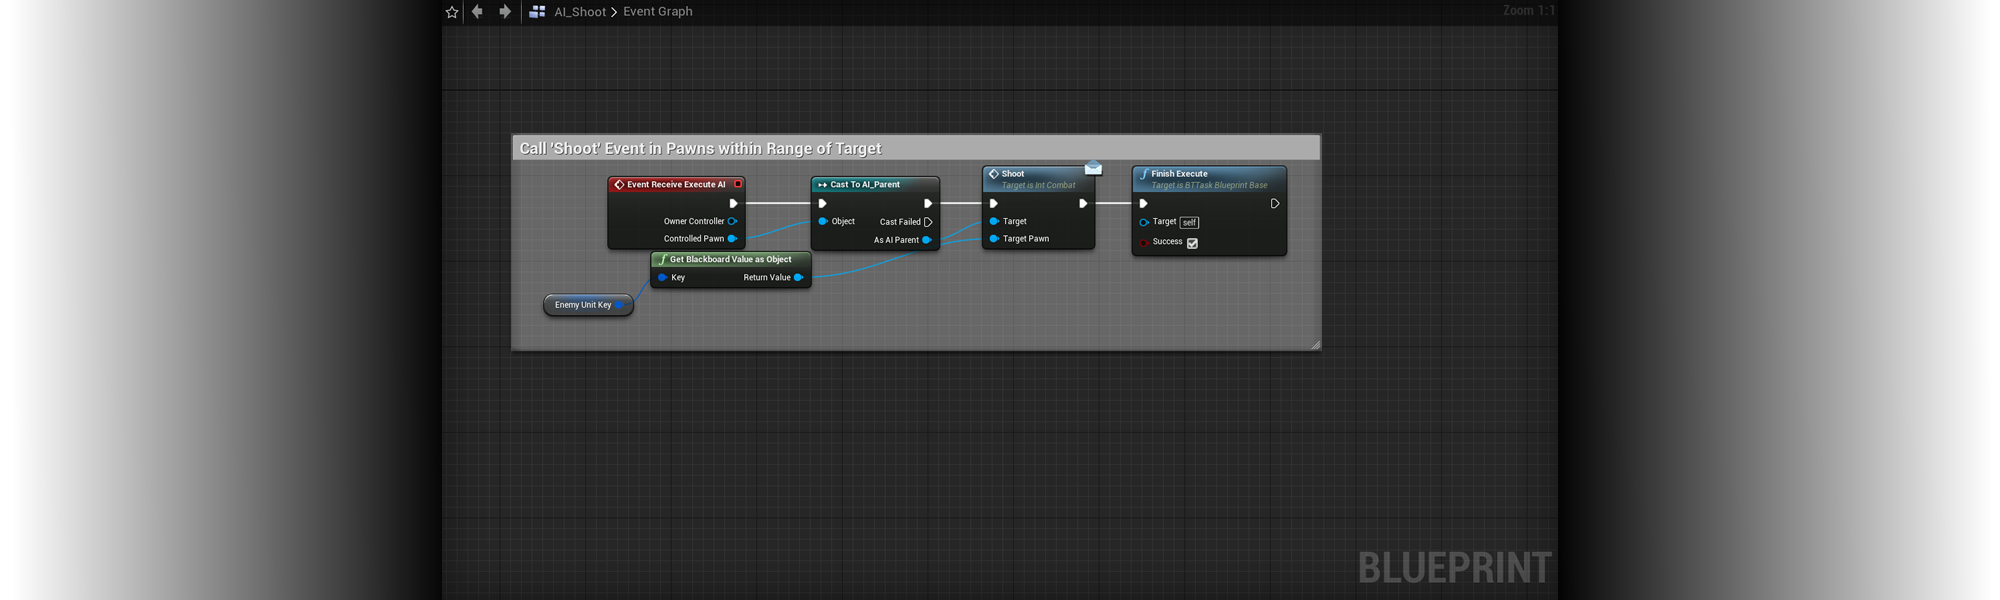
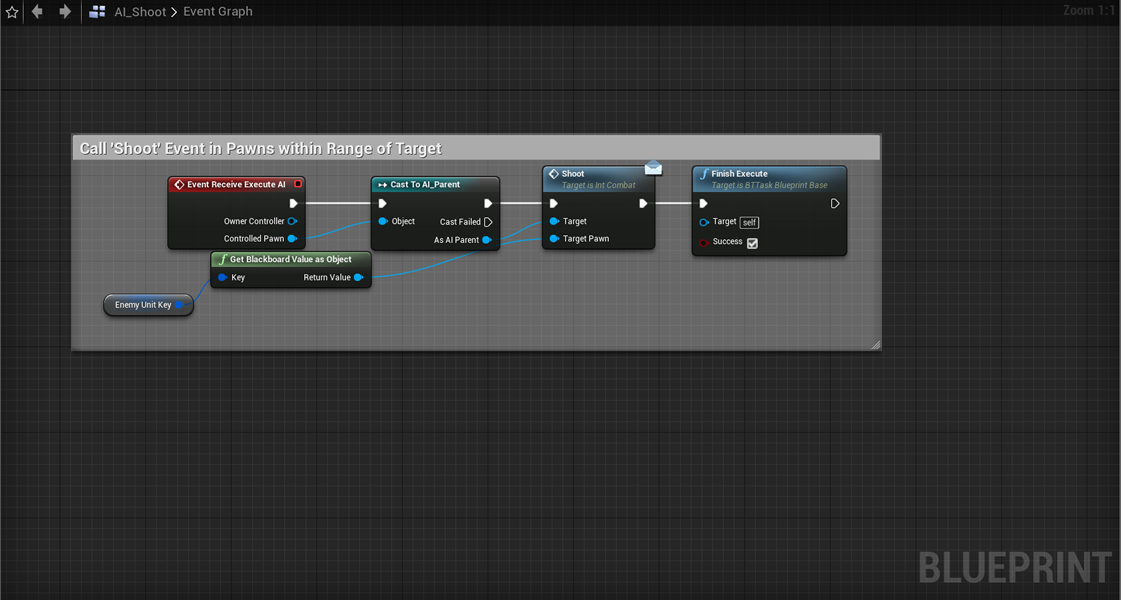
Once this variable has been set, as if there is no player imposed ‘MoveToLocation’ set, the pawn will then rotate to face the ‘EnemyKey’ target and run through the AI_Shoot task, this task simply utilises an interface to message the ‘Fire’ event within a controlled pawn. As each pawn/ unit type has different weapon fire rates, weapon ranges and weapon damage values. The values set in the child pawn’s individual blueprint will be the variables used for attacking.
The design of the High Orbit project requires multiple key bindings to be utilised for different functions depending on unit type. Three types of actor are created from the Parent_Baseclass object. With these being:
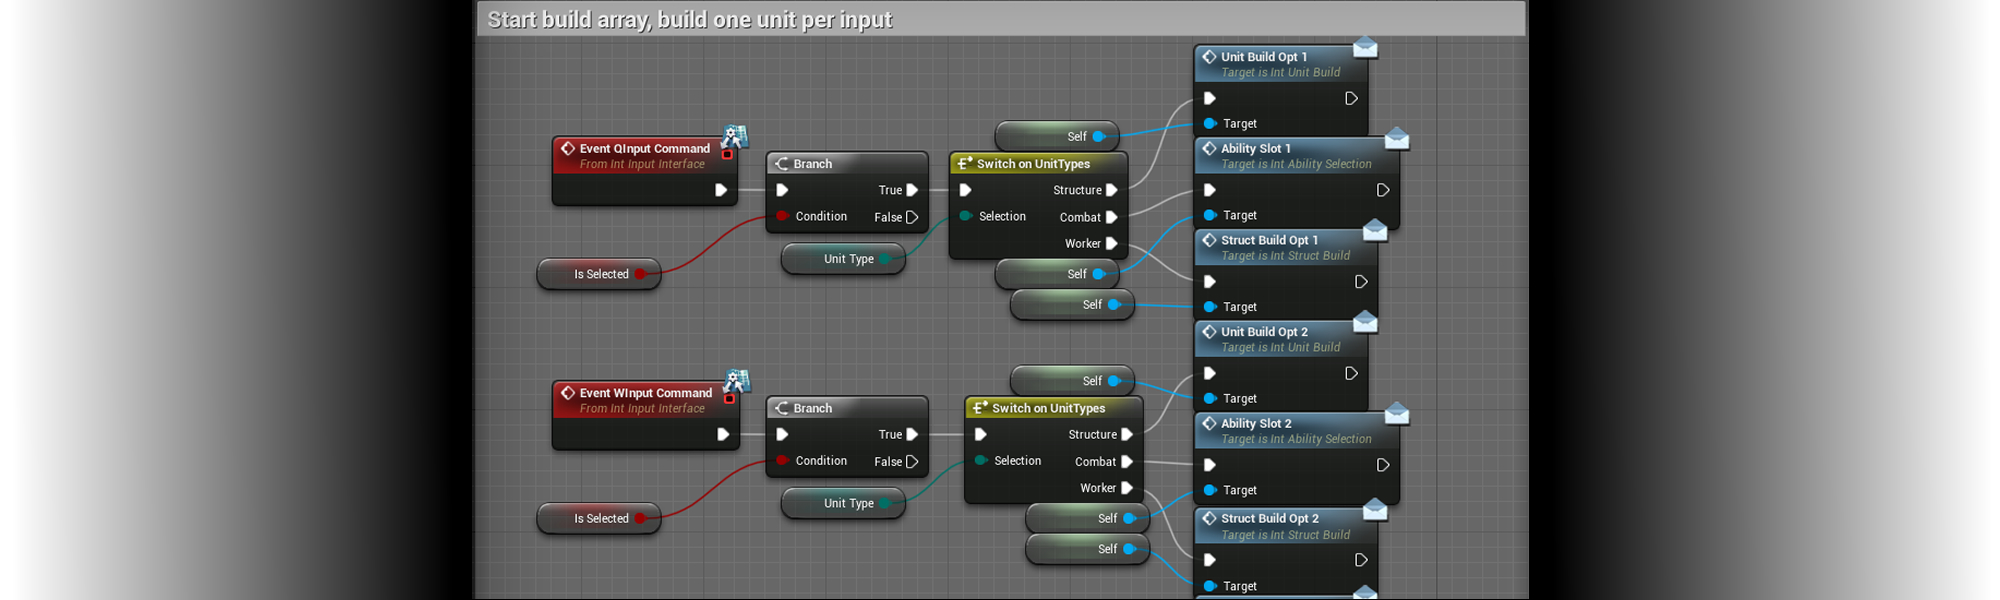
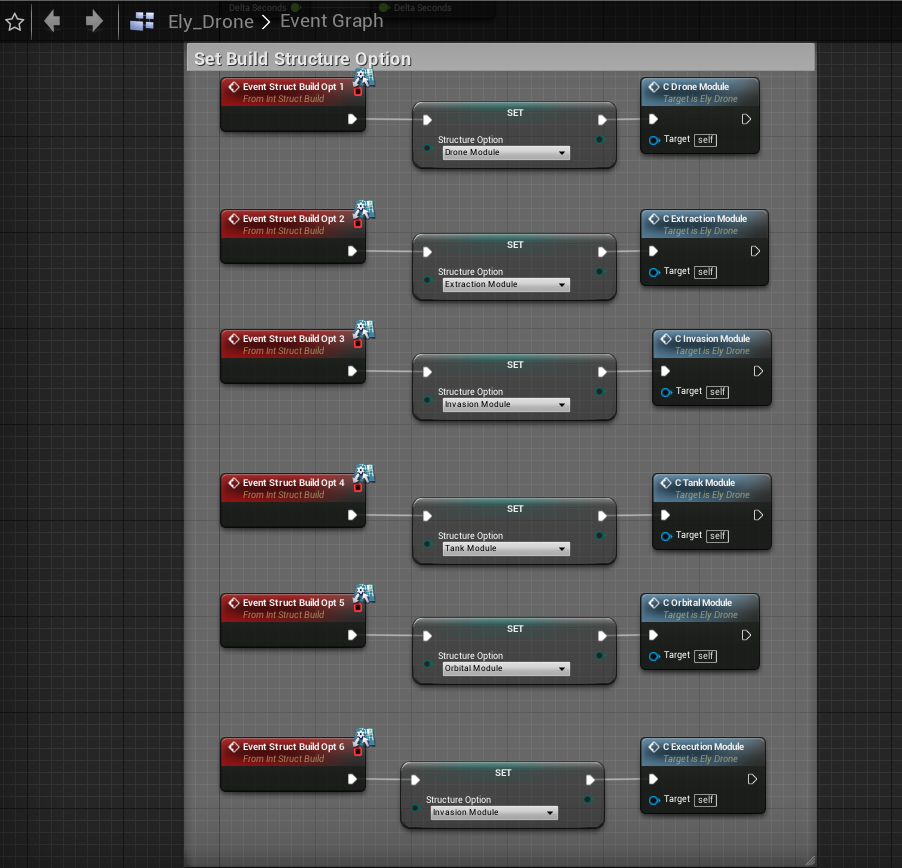
With the Q, W, E, R, T and Y keys all being used to allow the player to interact with the selected unit’s options dependent on type. An enumerator is used to determine unit type and then utilises an interface and messaging nodes to execute the selected units first, second, third or fourth, fifth or sixth ability slot as shown in the image below:

For this example, the Structure Build Options will be showcased as to how the worker units construct new buildings in keeping with the in-game economy system.
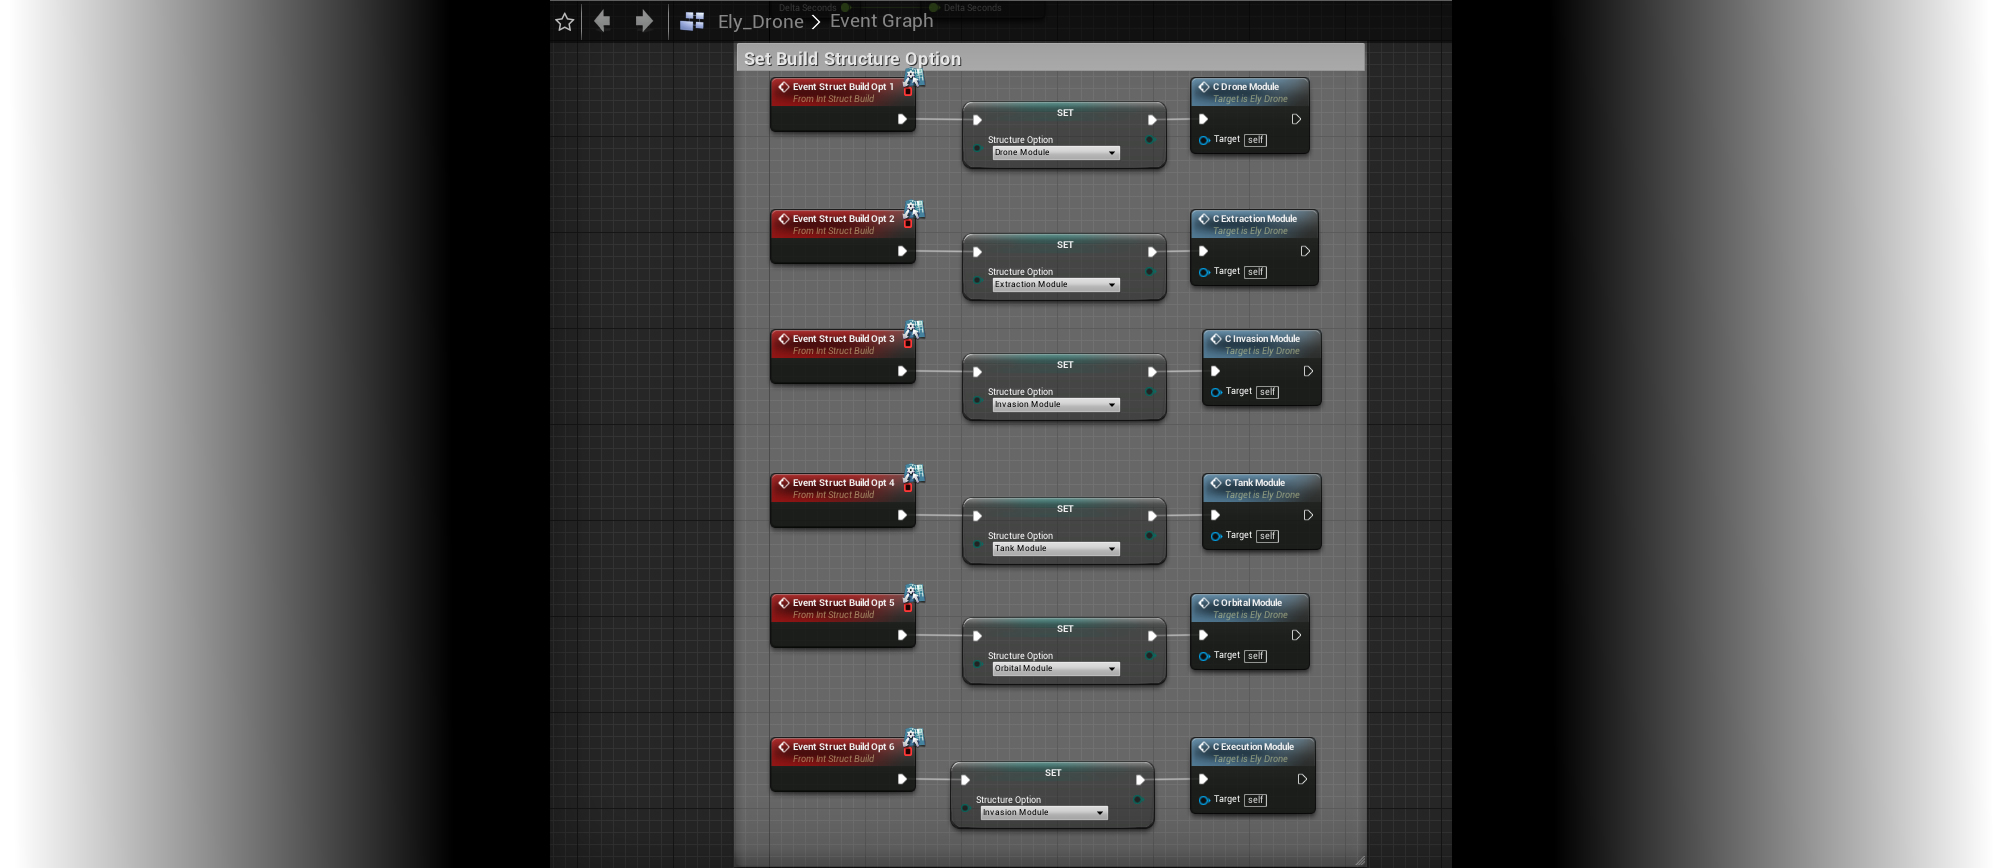
The sole method of building construction for the player is through Ely_Drone units, which build up to six possible unit producing structures, Variables such as build time, Structure Option and Health are all stored within the Drone blueprint:
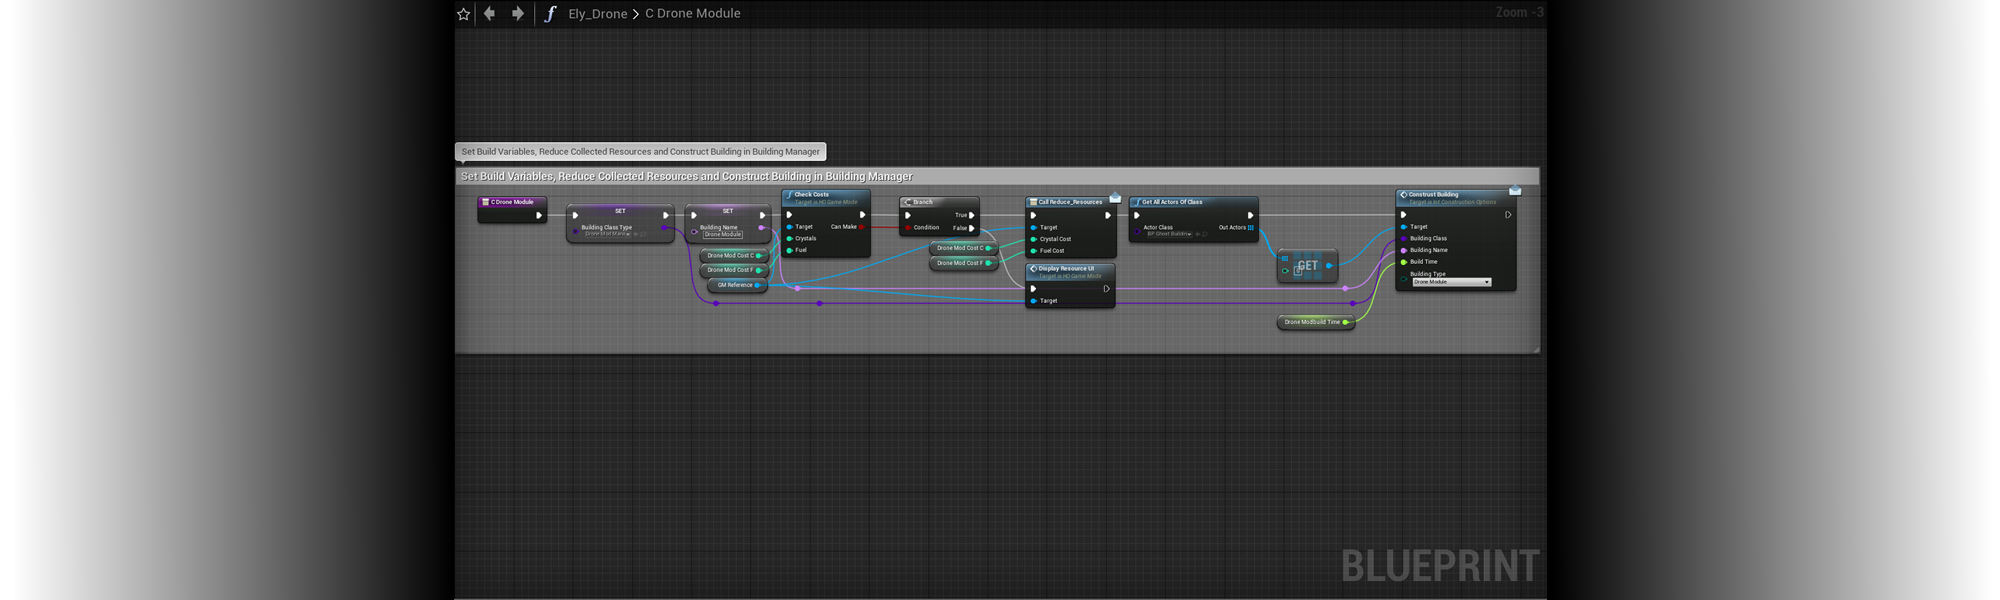
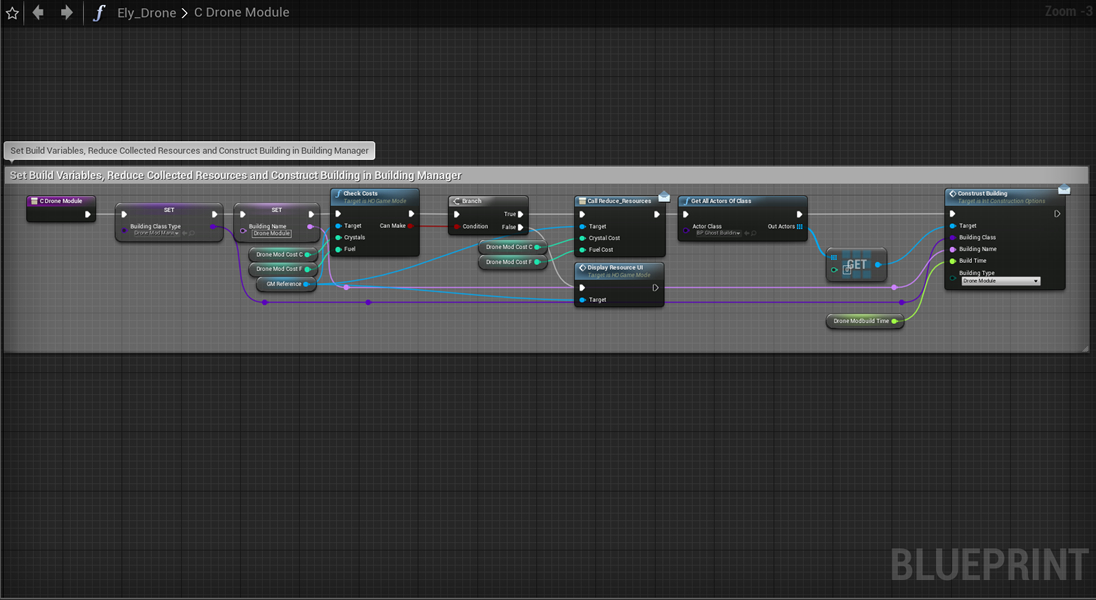
The image below showcases the ‘C Drone Module’ option path, and utilises a previously made macro within the gamemode, called through an event dispatcher to check to ‘Crystal Cost’ and ‘Fuel Cost’ collected by the player through mining against the required costs needed to create the selected structure, the ‘BP Ghost Building’ is a movable transparent actor which allows the player to place the building in any location they choose that isn’t blocked by another unit or structure. The ‘crystal’ and ‘fuel’ costs are then reduced from the collected value stored in the gamemode.
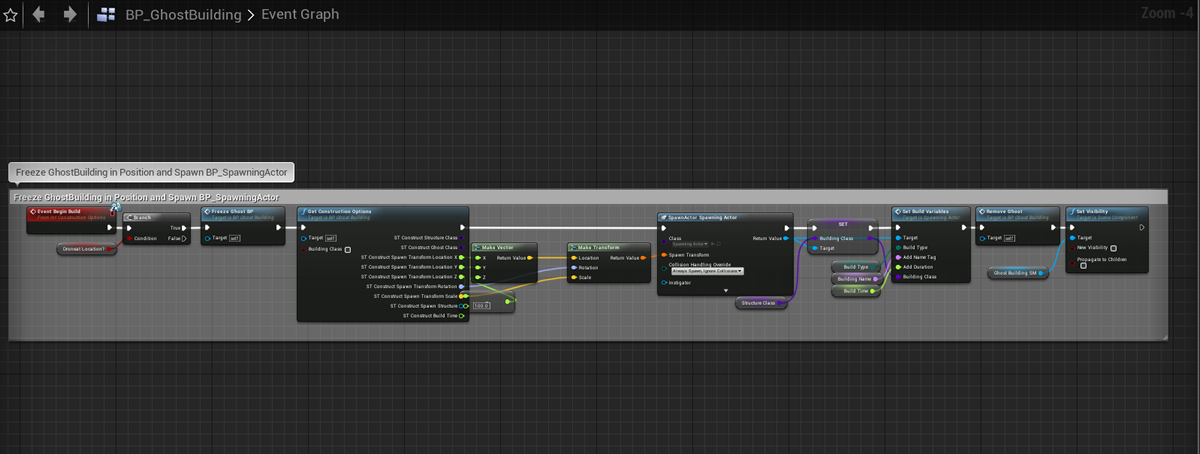
All the variables collated within the Ely_Drone unit are then passed to the BP Ghost Building which sets these variables with a struct node:

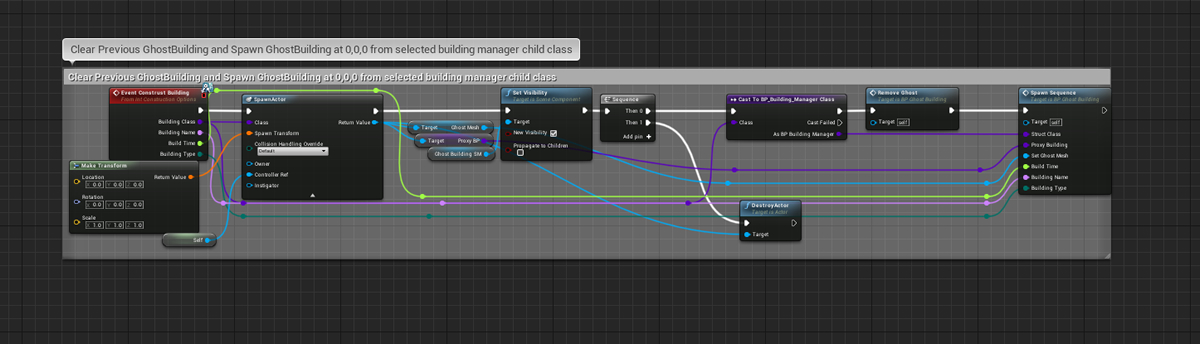
The building manager blueprint then spawns a spawning actor which acts as a visual representation of a building under construction, this actor retains all of the information from the struct, this is important as it allows the spawning actor to remain in the game world for as long as the initial ‘build time’ variable reaches <= 0:

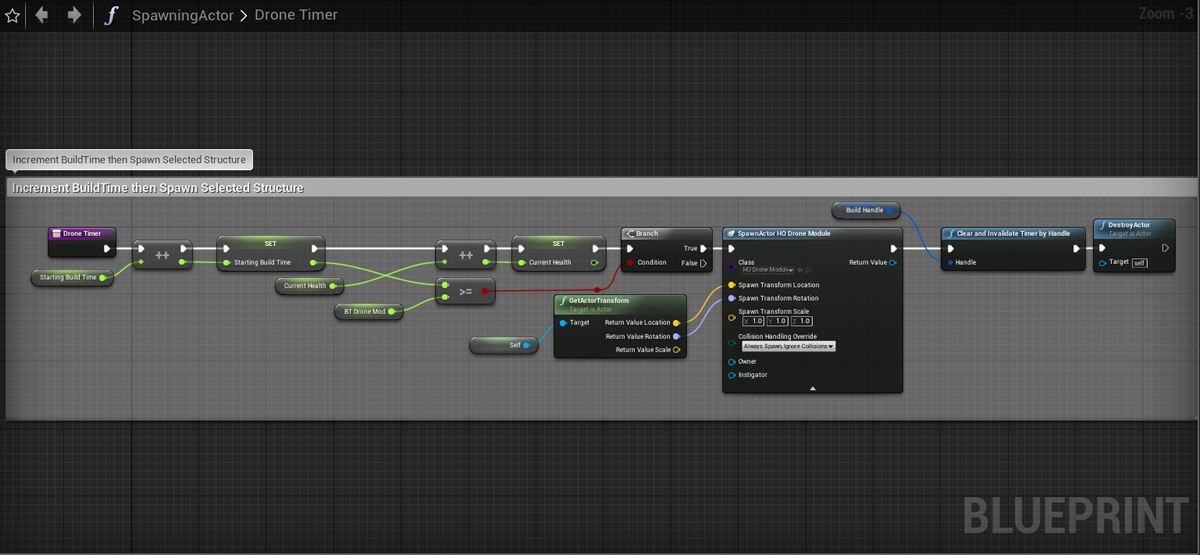
Once the spawning actor has reached the required build time in seconds, the building initially set in the Ely_Drone object is spawned, with the spawning actor timer being reset and the spawning actor destroyed. The spawning actor is a child class of the BaseClass and therefore can be destroyed during the construction process. At which point the spawning actor is removed without spawning the selected building:

The fog or war mechanic was a feature integral to every RTS game, and something that I had to replicate within my own project. With several different solutions attempted, the following method of fog of war creation proved to be the most effective; creating a polished fog of war effect with minimal taxing of the engine.
A render target was used along with two materials, one spawned on level start, this was an entirely black material used to mask all the sections of the level with the exception of the player spawn location:
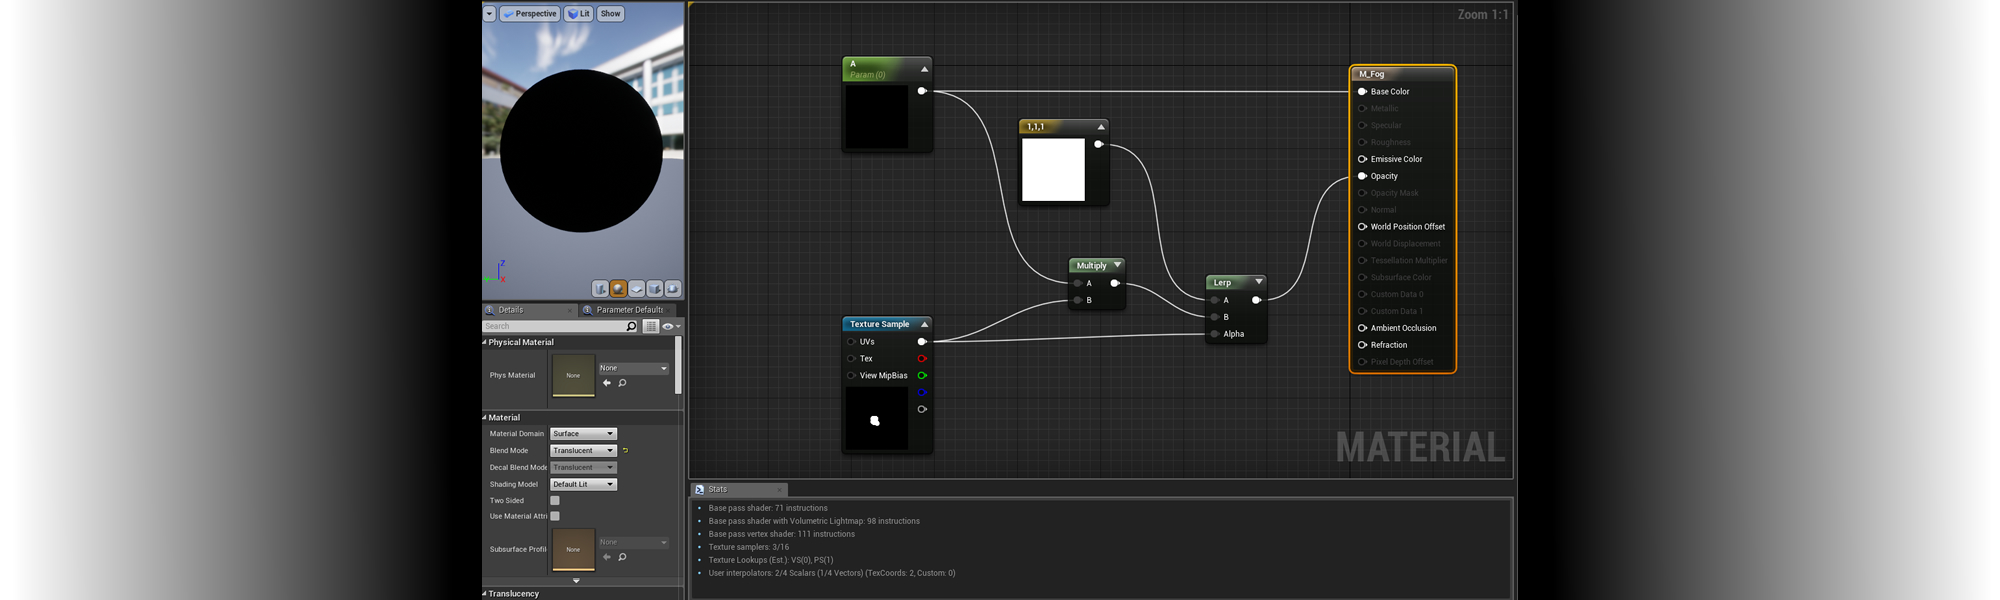
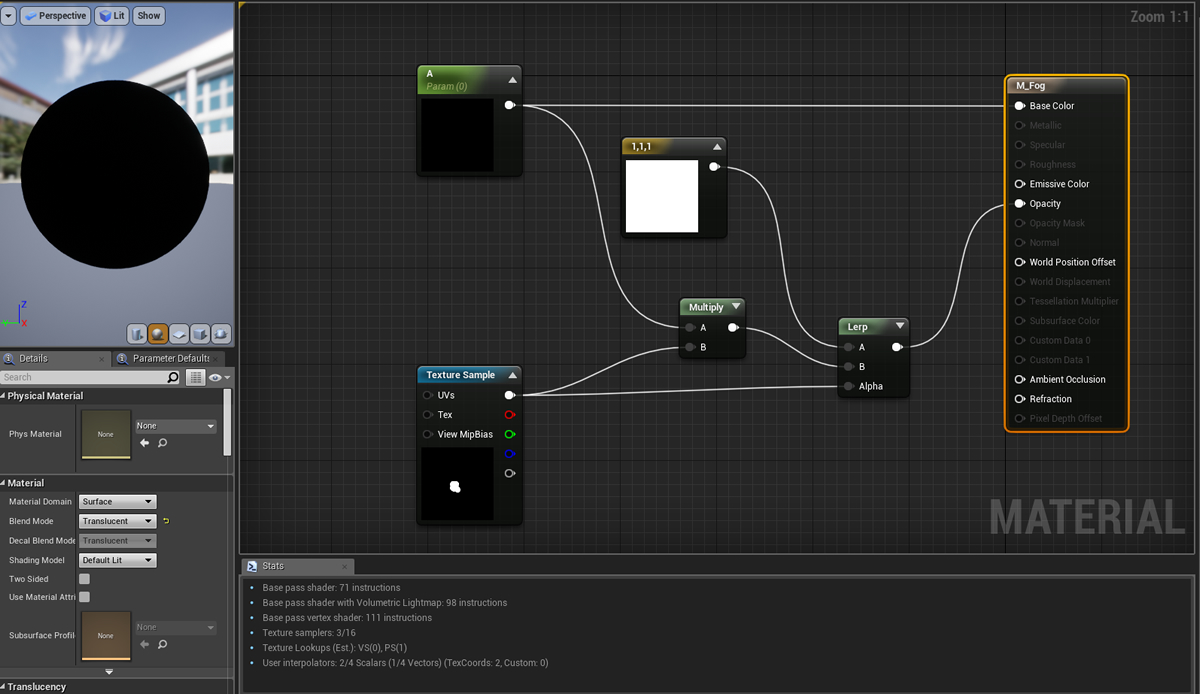
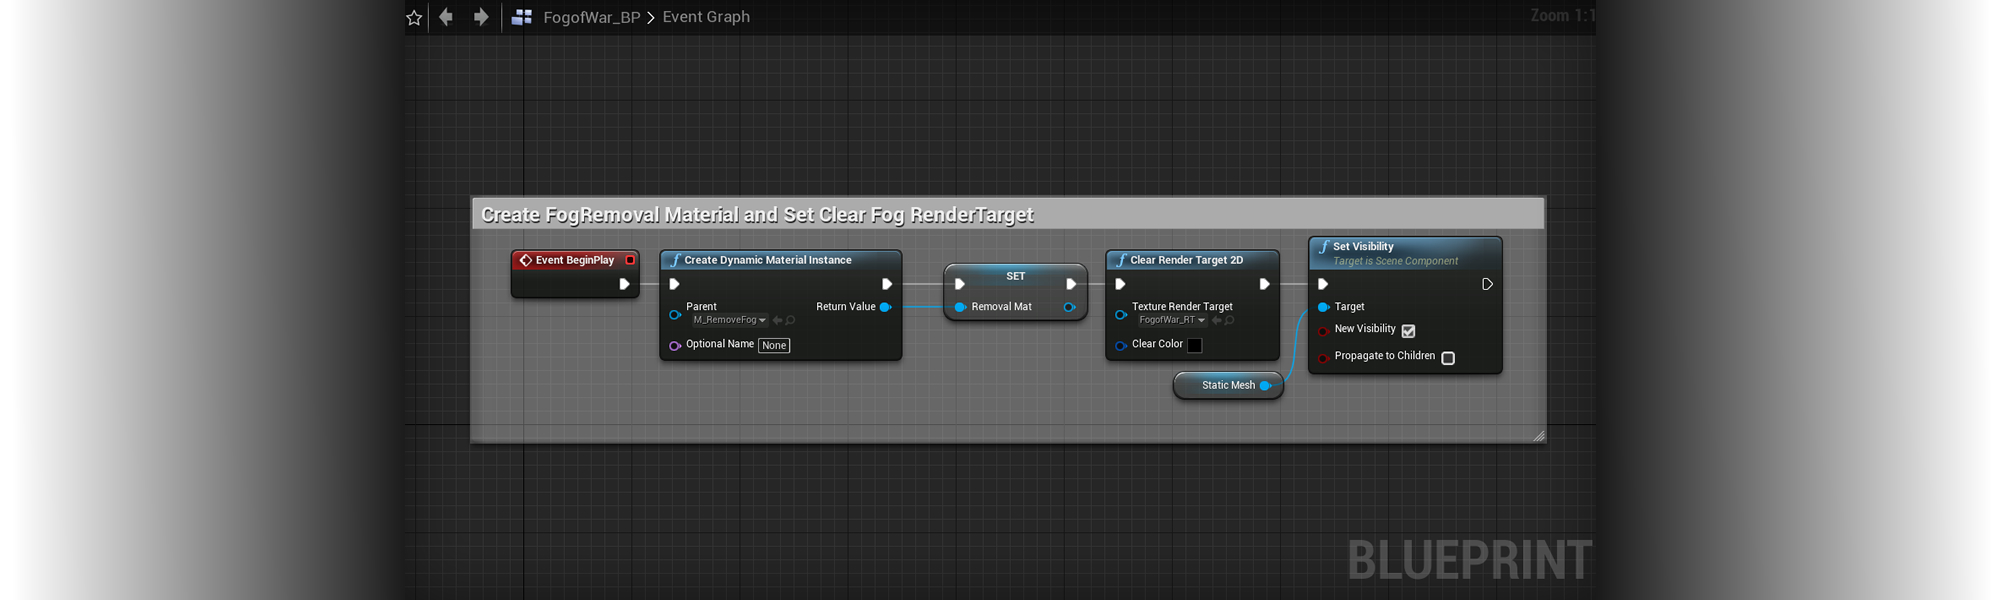
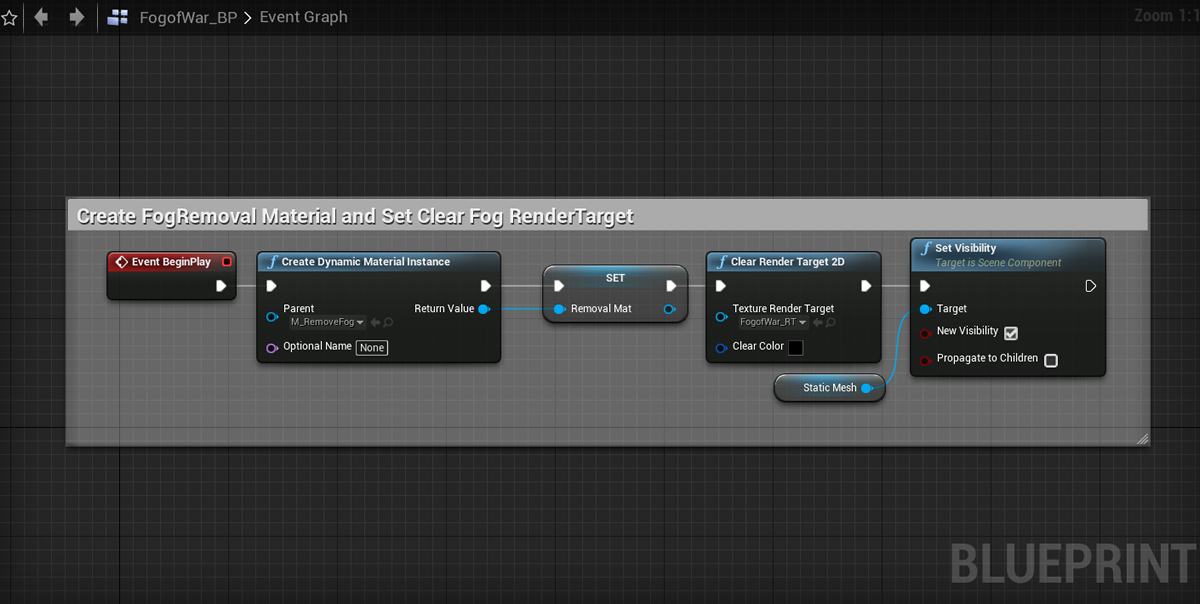
In the above image the removal material is also set as well as removing any potential remaining cleared fog from a prior game save by clearing the render target. In contrast to the M_fog material, the M_Removefog material is transparent, when this material is applied to the render target, this gives the impression of prior M_Fog being removed from the level and providing clearer vision:
To allow for a point of which to apply the removal material from, a camera is placed above the BaseClass object, this then applies a line trace from the forward vector of the camera, this returns a UV collision from the FogofWar_BP plane placed within the level and acts as a point of reference from which to apply to removefog material from:
To further reduce dependency on the engine, the on-tick event was removed and replaced with a 0.1 second timer, this timer executes the ‘clearfog’ event within the BaseClass as shown above. The ‘SubtractDrawVector’ function calls another event within the FogofWar_BP which utilises the editable ‘DrawLocation’ variable shown within the M_RemoveFog material to draw the removal material onto the render target:
The end result of this mechanic is combined with a sphere trace from player controlled actors to set the visibility of enemy units outside of vision range and within the fog to hidden as shown below:
The FPS Inventory is a hidden object placed within the game world that acts as a storage space for the player. Having the inventory as a separate object reduces the amount of functions within the already large player class.
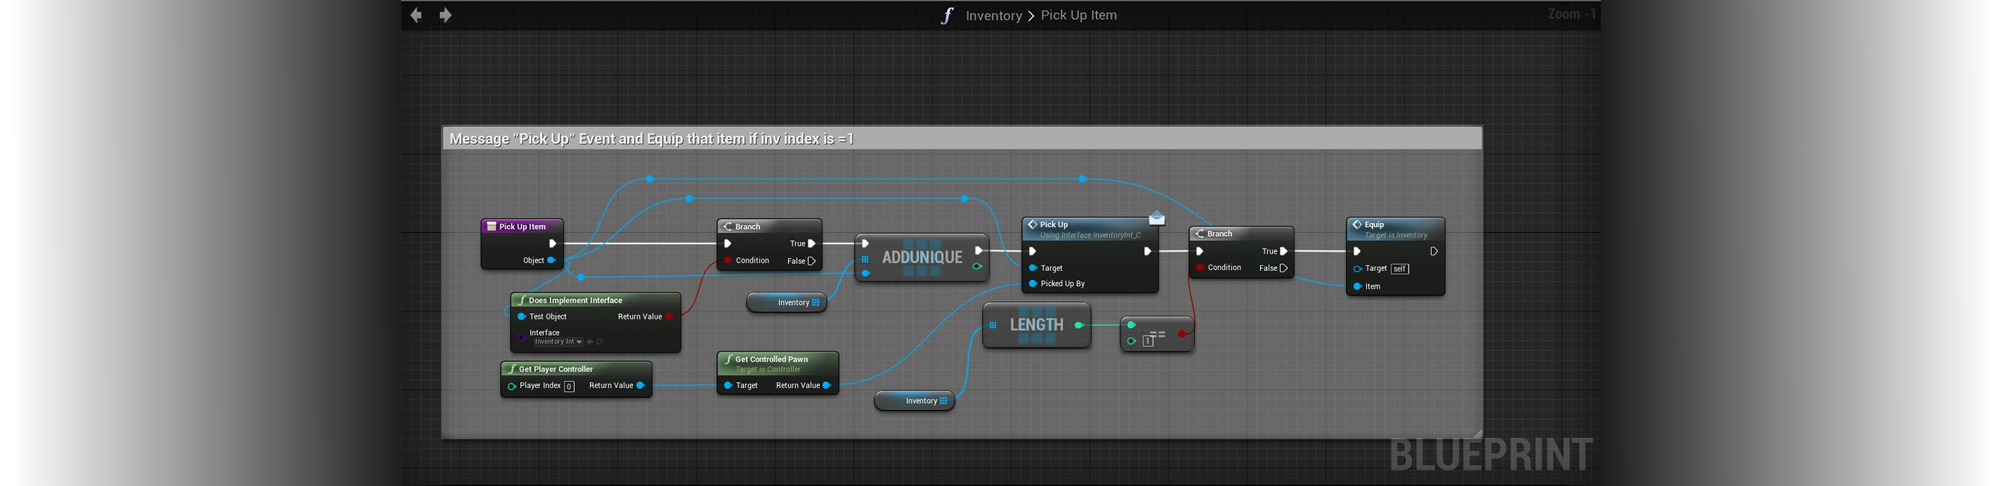
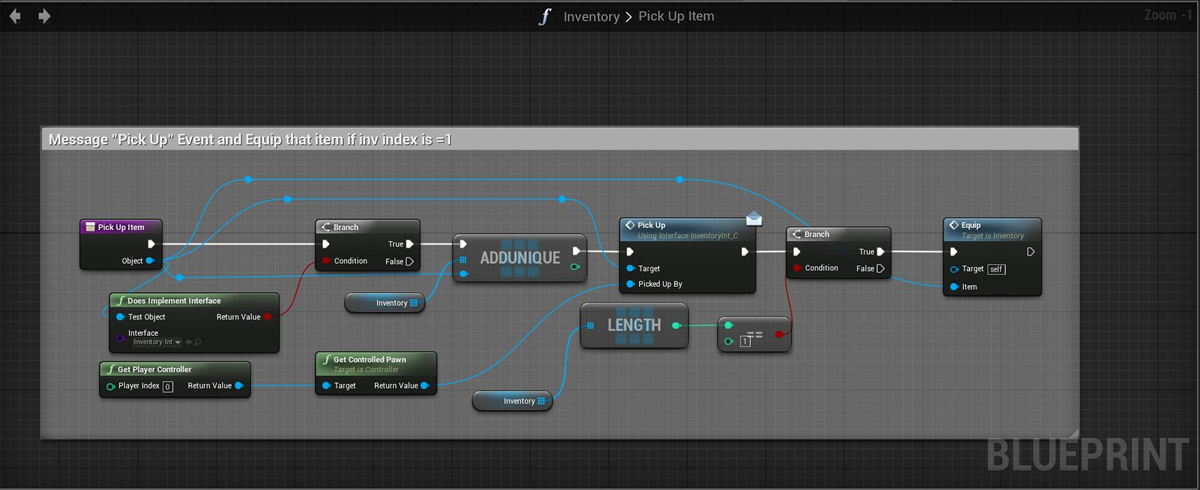
Weapons and object that can be picked up by the player use an interface to hide the pickup and place it within the inventory index, if the player does not have any weapons in their inventory already then the inventory automatically equips the weapon at slot 0 as shown in the image below:
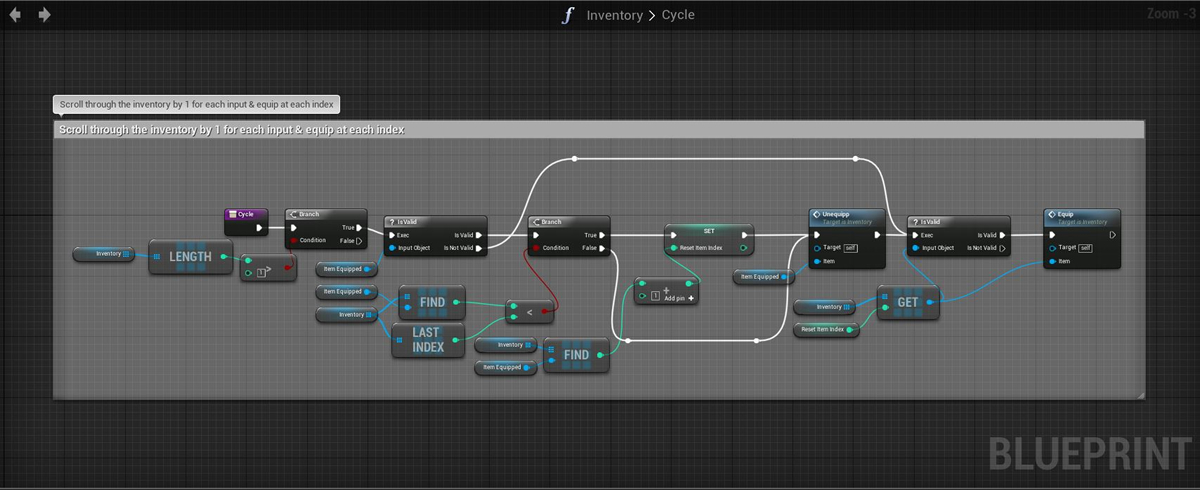
Players are also able to cycle through their inventory using the mouse wheel which unequips the currently equipped item and finds and equips the next item in the array, if the player reaches the final object within their inventory this function also resets the cycling of the inventory back to slot 0 as shown in the image below:

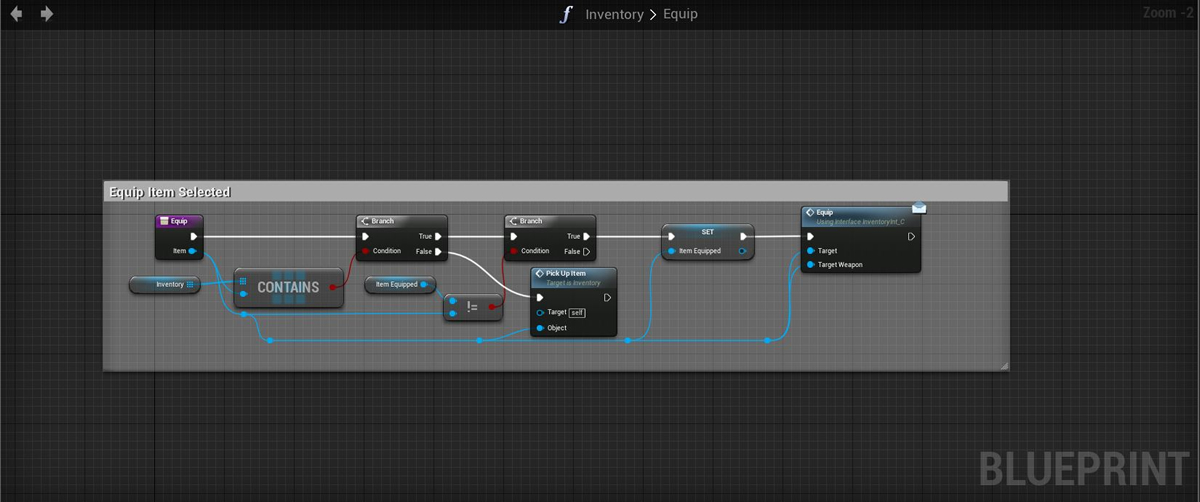
Items that are either equipped through cycling or by being picked up by the player are placed within the ‘Currently Held Weapon’ slot, if the player attempts to equip an item they do not have within the inventory this function will also pick up the weapon if there is a matching actor nearby:

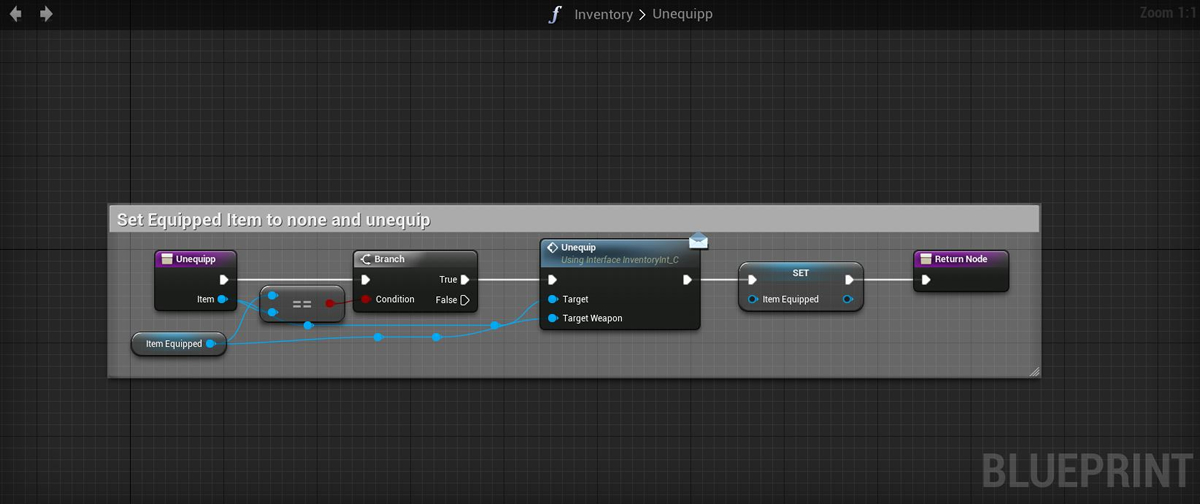
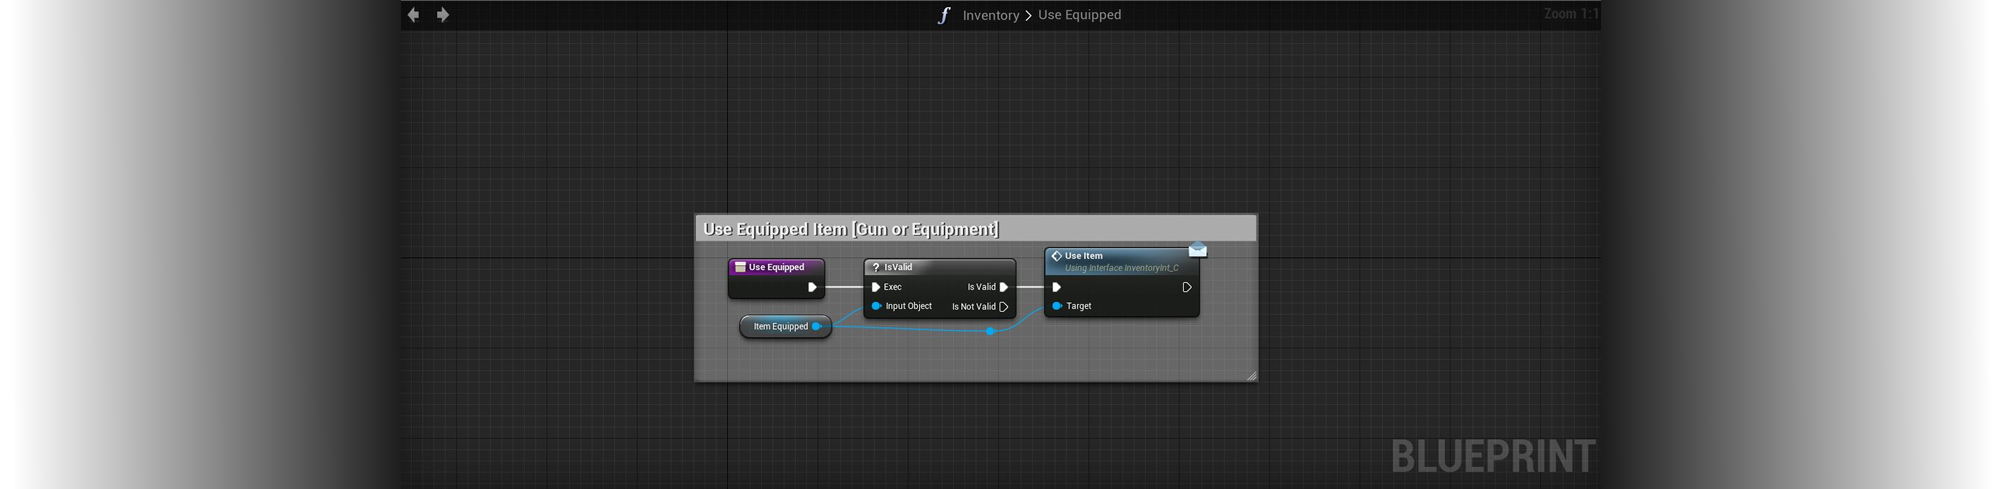
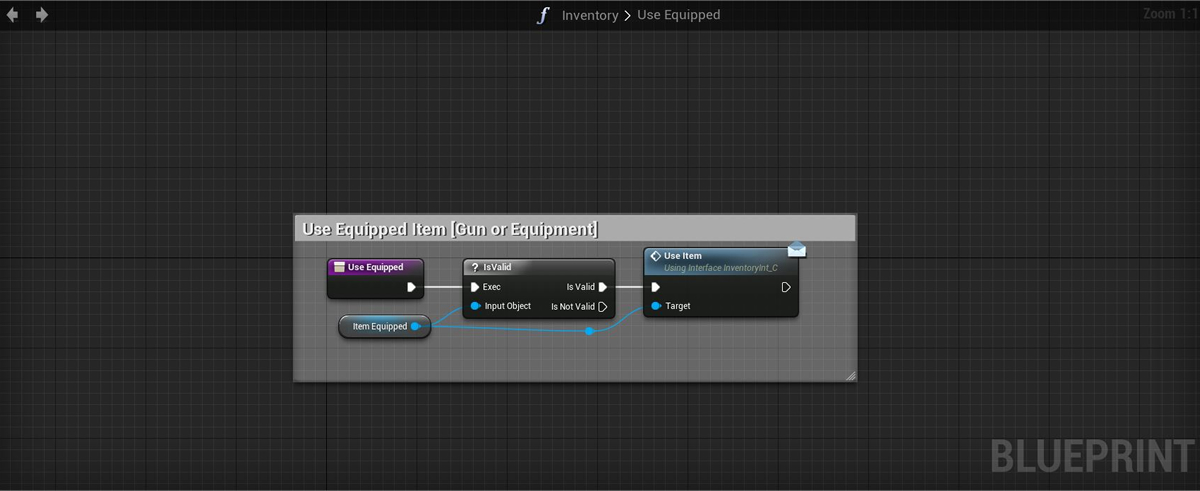
Items can also be unequipped and placed back into the inventory of used if they are the currently equipped item. Using a ‘Use Item’ interface rather than an individual event for each item ensures that the same input used for firing the currently equipped weapon and throwing a grenade can be handle via the same input. Both of these mechanics are shown in the images below:

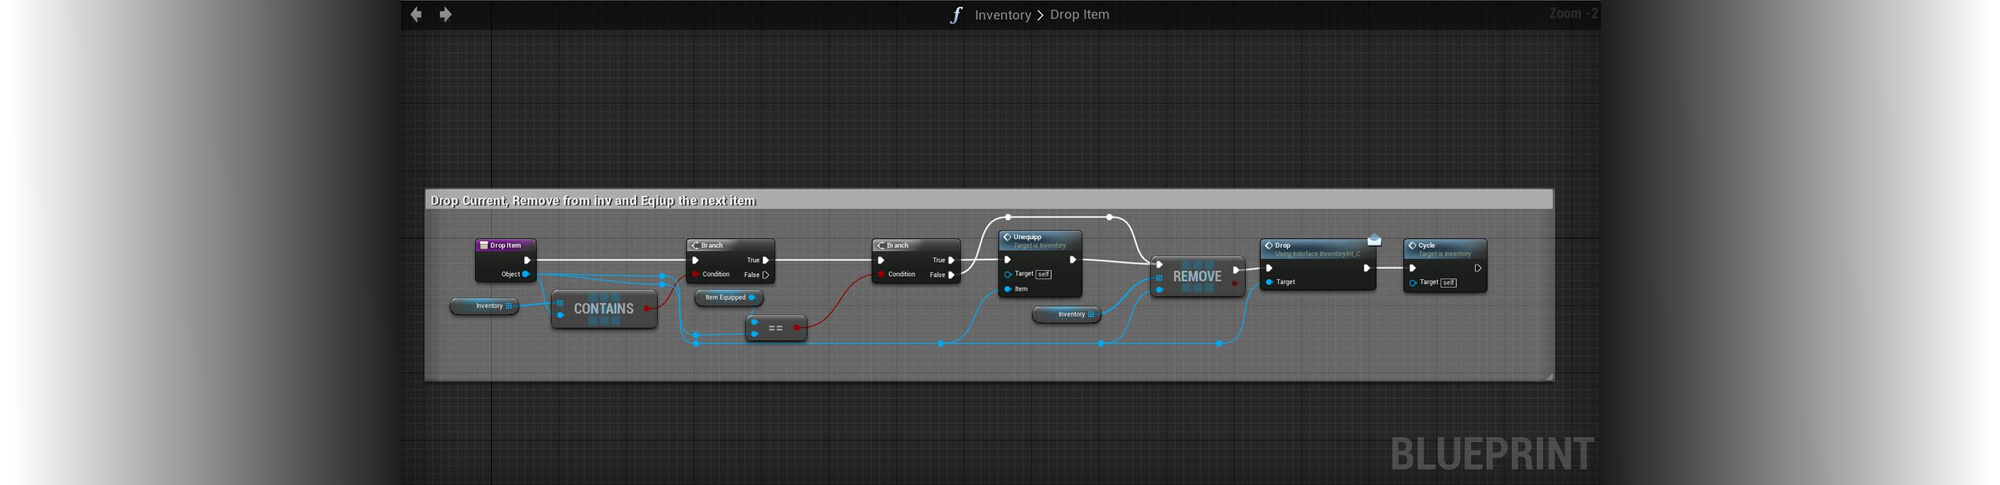
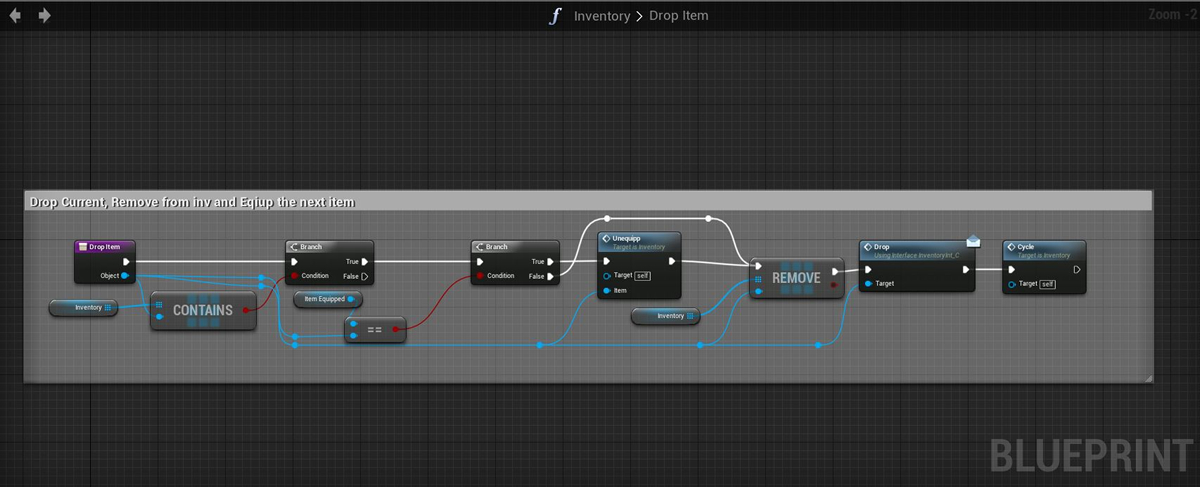
The final option within the inventory system is a drop function, this removes the selected item from the array entirely and within the item blueprint also spawns a pickup in front of the player which retains the same ammo capacity as was used when the player removed the item. This allows the player to potentially re-equip the dropped item from the location that the item was dropped.
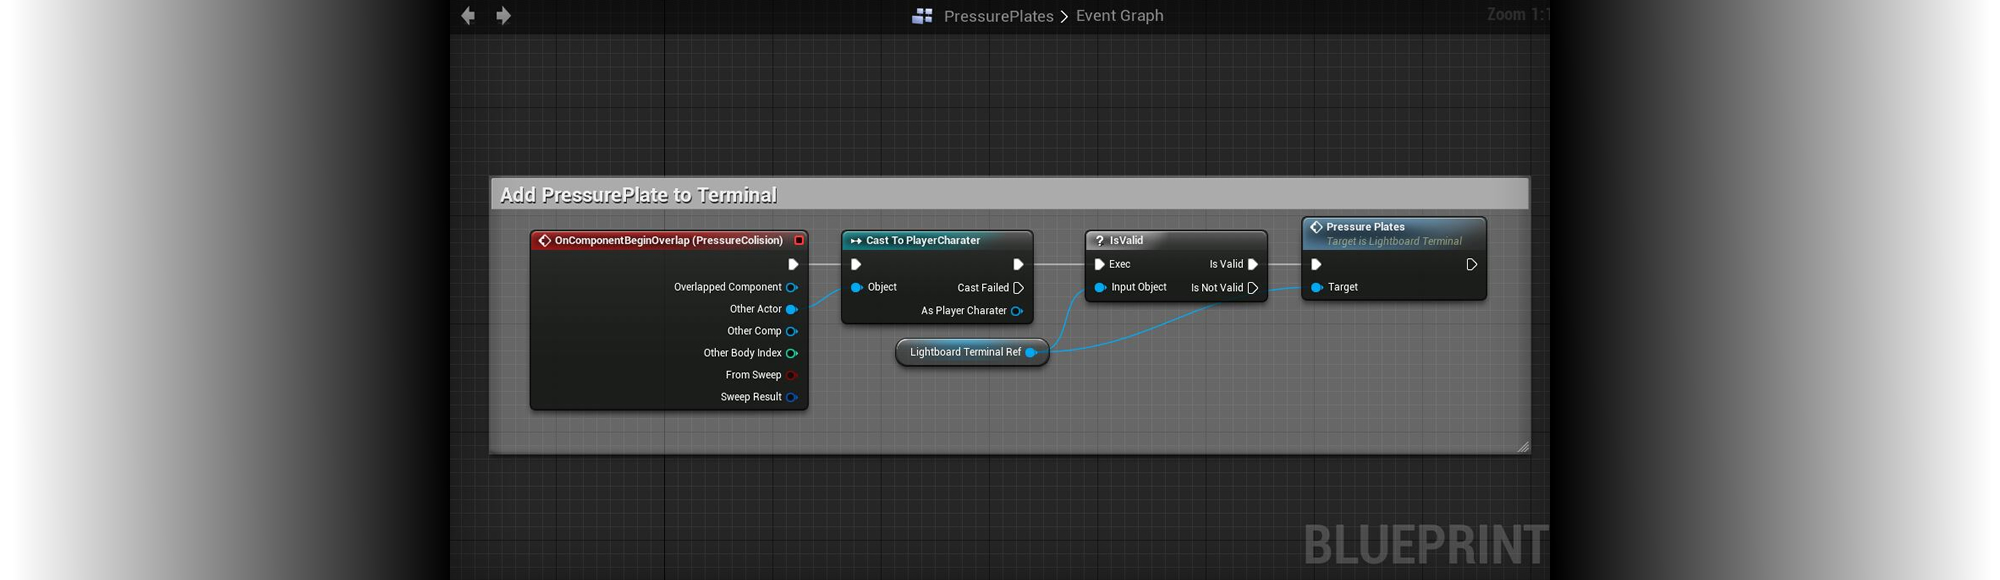
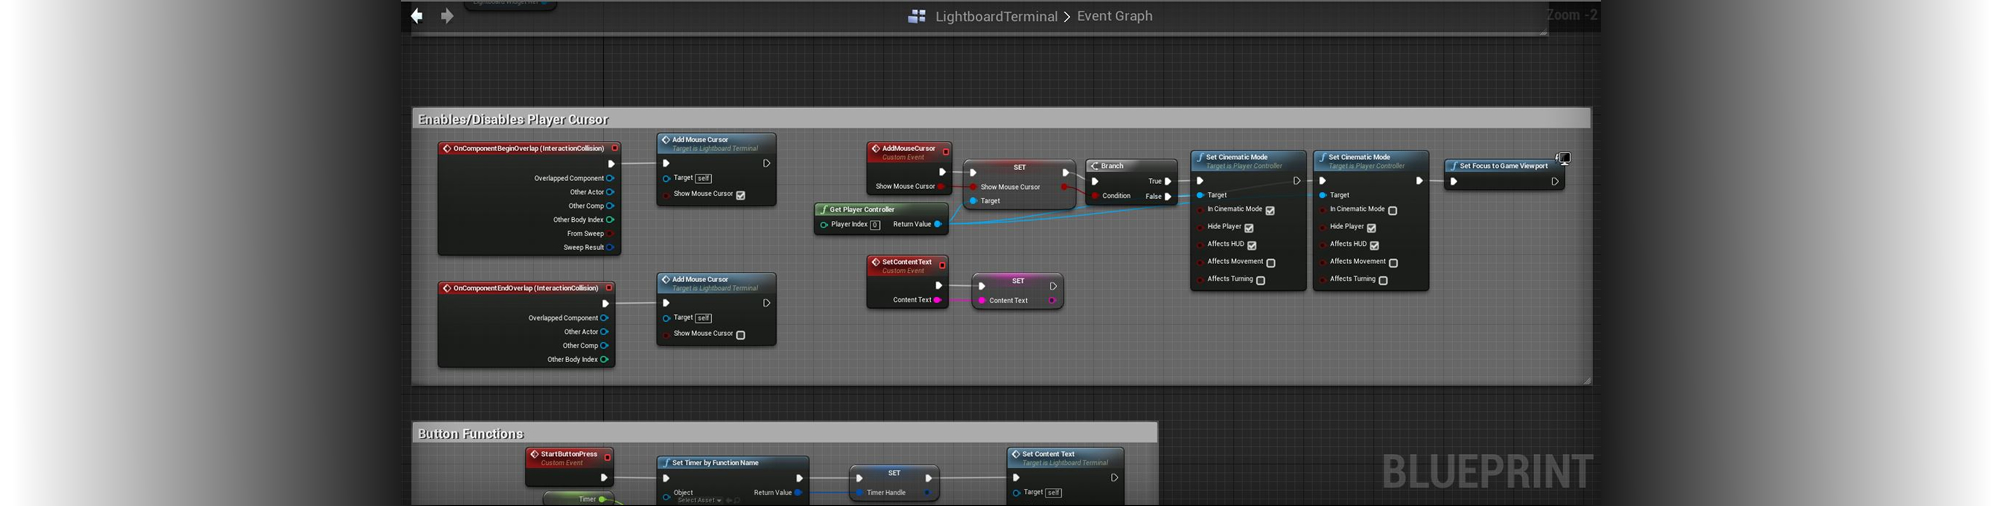
This mechanic presents the player with a grid of pressure plates and an interactable virtual screen, the screen displays the correct sequence of pressure plates for the player to move over only once. Therefore, the player must memorise the correct sequence to unlock the level door and escape the room. The majority of the functionality for this mechanic is stored within the virtual terminal, with the player mouse being displayed and when the player initially approaches the screen within the terminal collision radius; as shown in the image below:
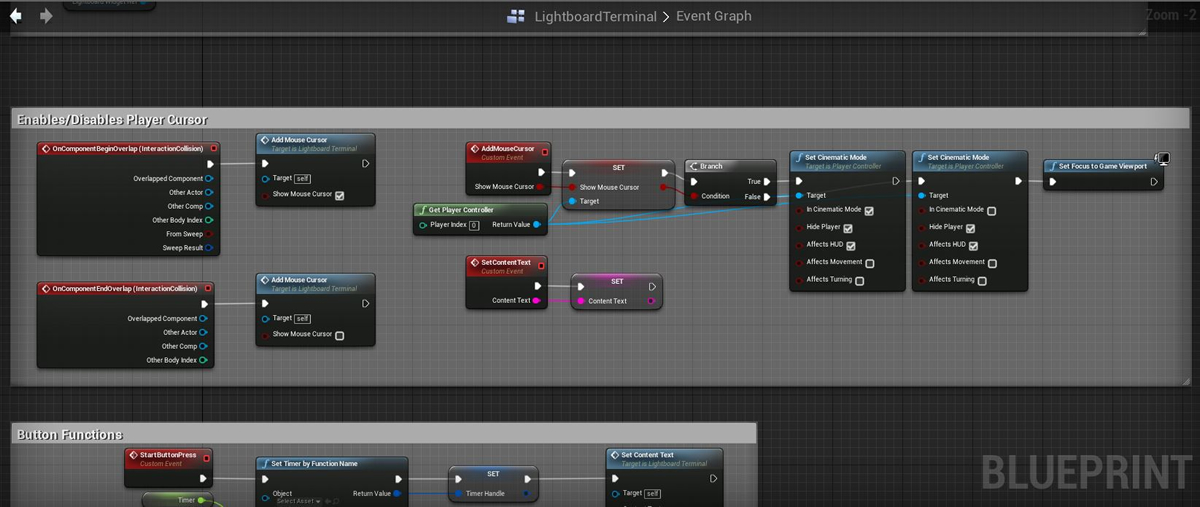
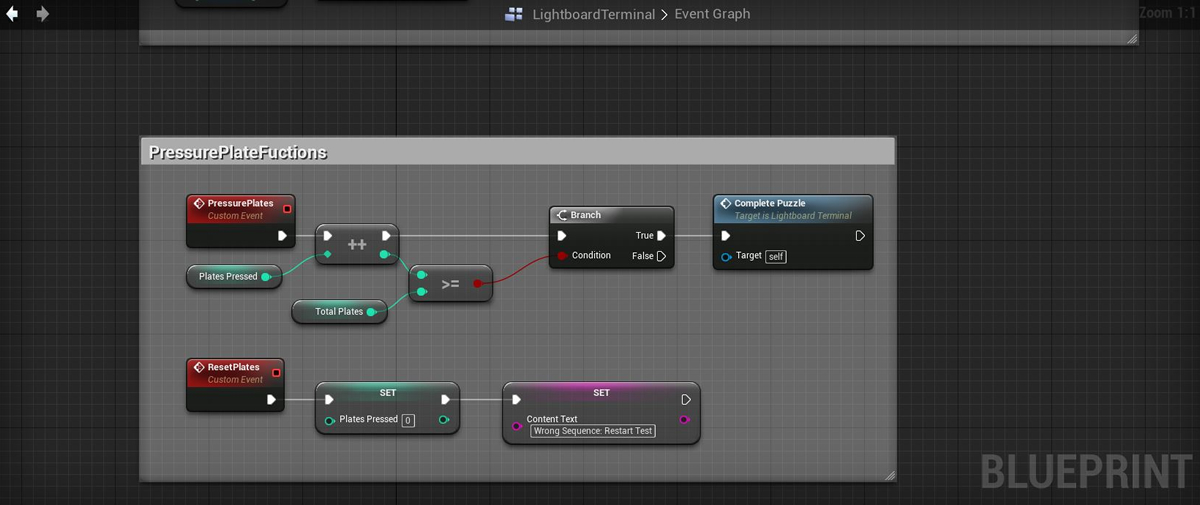
The timer for showing the player the correct sequence is set to five seconds, when this timer expires the player will not be able to see the sequence a second time as the sequence text is hidden. The player does however have the option to start the puzzle:

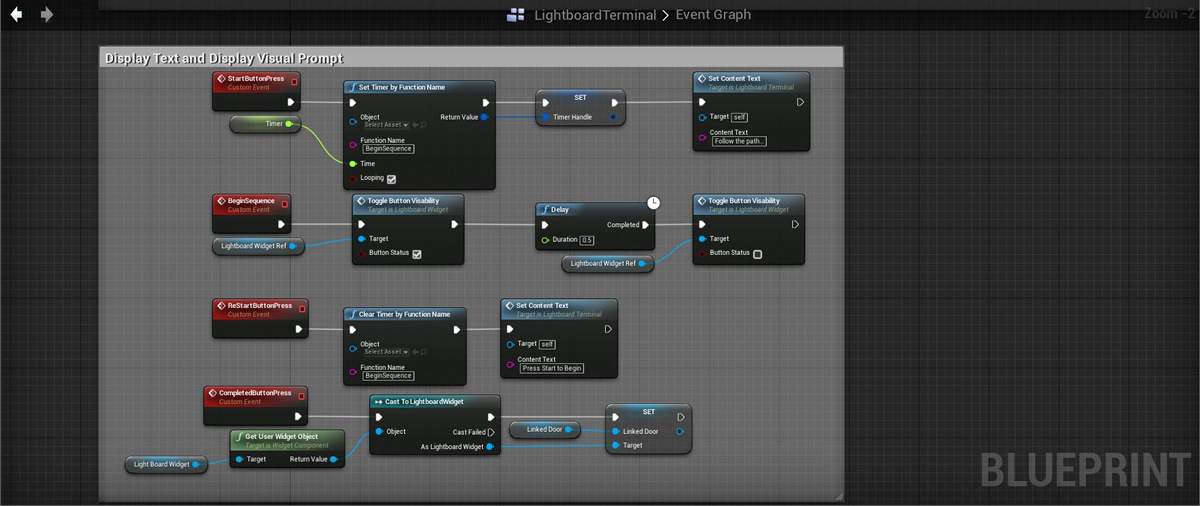
The functionality of messaging the terminal when the player moves over the correct plates is displayed within the pressure plate blueprint, these are identical to the false pressure plates to the player but utilise the terminal direct reference to increment the ‘Plates Pressed’integer by 1 for each correct plate that the player moves over. Once the six correct plates increment the terminal value to six a new button is displayed within the ‘Terminal UI’ which displays another button to allow the player to open the level door: